Showing posts with label Assembly. Show all posts

Tuesday, October 7, 2014

Write Your Half BIOS

What is BIOS? BIOS is shorten from Basic Input Output System. Don't doubt it. That is really meaning of BIOS. Someone says that the purpose of BIOS is to boot OS. I don't think so. OS should be optional. What is Input? The keyboard and mouse are input devices. What is Output? The monitor and port 80 are output devices. If you write a program that enables input and output devices and your program is performed by CPU at reset vector, your program is BIOS.

I'm glad to see the page has the same idea of writing your BIOS. The page was written by Harrison Hsieh who is my former colleague.
http://biosengineer.blogspot.tw/2007/12/x86-bios4.html

My page just describes how to write a Half BIOS, a program that is performed by CPU at reset vector but it doesn't enable input and output devices. I also demonstrate how to run the Half BIOS with Bochs.

The following are source code of Half BIOS.

HalfBios.asm


Please follow the steps to build it by MASM and run it with Bochs.

Step 1. Build it with MASM611 or above.

> masm HalfBios.asm

The HalfBios.obj is generated.

Step 2. Update bochsrc.bxrc to change romimage file to HalfBios.bin

# romimage: file=../BIOS-bochs-latest
romimage: file=../HalfBios.bin

Step 3. Manually generate HalfBios.bin

> copy BIOS-bochs-latest HalfBios.bin

Please manually copy the 32 bytes with the signature "########" from HalfBios.obj to the offset 1FFE0h in HalfBios.bin. The content of 32 bytes is the program of Half BIOS.


Please make sure that there are EB F3 machine code at the offset 1FFF0h where is reset vector.

Step 4. Run Half BIOS with Bochs in debug mode.

C:\Program Files\Bochs-2.6.6\dlxlinux>..\bochsdbg.exe -f bochsrc.bxrc

We see that CPU performs the Half BIOS at the reset vector, f000:fff0, and then jump POST entry point.

-Count

Sunday, October 5, 2014

Auto Run Debug Command with Script

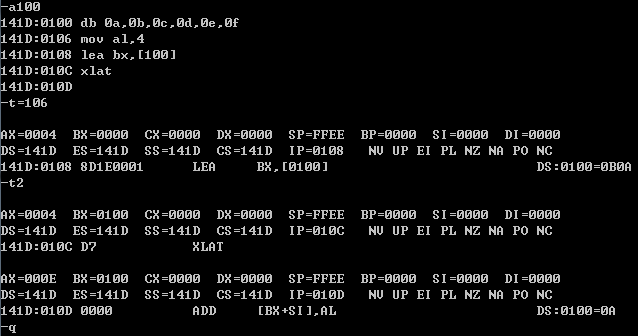
The DOS debug.exe is a good utility to learn basic x68 Assembly language because we don't need to compile and link an ASM file and we just run it directly by entering commands. Sometimes we want to keep our interesting commands in a script file and automatically run it again with debug. How do we do it?

We can use a redirection (<) to read script file instead of the console. For example,

Please create script.txt that has the following lines:

a100
db 0a,0b,0c,0d,0e,0f
mov al,4
lea bx,[100]
xlat
(Enter to make a blank line)
t=106
t2
q
(please press Enter to make a blank line)

Please run the command.

debug < script.txt

Below is the result:


-Count


Friday, September 19, 2014

Use MkLink to Solve the MASM611 EXE at 8.3 Directory Name

The title is shorten from "How to use MkLink to solve the problem that the EXE file built by MASM611 cannot be workable at the directory named with 8.3 format in Windows environment."

Sometimes we use MASM611 to write Assembly code in our Windows 7+ environment. If your name of source code directory is long (non 8.3 format), it will be a problem. For example,


Below is the content of Hellow.asm.


Before compiling the ASM with MASM611, please set the MASM611 path as follows.
>set path=%path%;c:\MASM611\BIN;c:\MASM611\BINR

Then please run ml to compile Hellow.asm. (Sometimes the system hangs because the you run it in the long directory.)


The HELLO.EXE is generated. Please run it.


Unfortunately, it cannot be workable. I guess that it is caused by the EXE file built by MASM611 cannot be workable at the long directory. How do you keep the long directory and make it workable?  You can 1) copy the EXE file to the root directory and run it, or 2) use MkLink to create a link directory, Hello, with 8.3 format.
>mklink /d "D:\Test\Hello" "D:\My Personal Data\範例程式\Hello World"

The link Hello is created in the Test directory.


Then you can run HELLO.exe in the link directory.


Finally you can edit the Hello.asm, compile it, and run it again in the link directory. All of your changes will impact the original directory.

-Count

Saturday, September 13, 2014

Use Bochs to Lean BIOS Entry Point

It's Sunday in autumn. Really nice weather with wind, not hot. I can see sun, white cloud, and a small far island on the sea out the window. I want to be outdoor to enjoy the weather, but there is a more interesting thing I cannot bear to skip it. That is to use Bochs to trace BIOS entry point. You should be interested in the task if you are/will be/was a BIOS engineer.

Bochs is a PC emulator. I've introduced it in my blog page.
http://countchu.blogspot.tw/2014/09/bochs-pc-emulator.html

Bochs reads a file, BIOS-bochs-latest file, to be a BIOS of the PC emulator. We know that CPU considers the address f000:fff0 as a BIOS entry point when the PC is power on. So we open the  BIOS file to get the last line.


We can find that there are machine codes and a date signature, 08/02/13, that I guess as the released date of the BIOS. What do the machine codes mean? Le's use debug command in prompt.

> copy BIOS-bochs-latest test.bin
> debug test.bin

So the the assembly language of the machine codes is JMP F000:E05B. Le's show the machine codes at F000:E05B.

The code started at XOR is POST Entry Point. Please refer the link to know what it is.


Above is a way to manually trace the BIOS entry point. How to use Bochs to easily trace it? Just run bochsdbg.exe, a debug mode of Bochs.

>  bochsdbg.exe

It is just like the DOS debug command, it is broken at the line of <bochs:1> to wait for user command. I send the help command to display how to use it. Then I select the n command to trace BIOS entry point step by step. It displays in assembly language and teaches us how BIOS entry point works. Is it interesting?

-Count