The steps, referred to the page, of connecting MacBook to Ubuntu in Gen8 via AFP are as below.
1. Install AFP Server in Ubuntu
>sudo apt-get install netatalk
>sudo apt-get install avahi-daemon
2. Specify the config of Avahi
>sudo gedit /etc/avahi/services/afpd.service
<?xml version="1.0" standalone='no'?><!--*-nxml-*-->
<!DOCTYPE service-group SYSTEM "avahi-service.dtd">
<service-group>
<name replace-wildcards="yes">%h</name>
<service>
<type>_afpovertcp._tcp</type>
<port>548</port>
</service>
<service>
<type>_device-info._tcp</type><port>0</port>
<txt-record>model=Xserve</txt-record>
</service>
</service-group>
3. Specify the shared directories.
>sudo gedit /etc/netatalk/AppleVolumes.default
/home/your_home "your_home"
/media/your_hdd "your_hdd"
4. Restart the service
sudo service netatalk restart
sudo service avahi-daemon restart
5. Open MacOS Finder to connect the AFP server.
Input the IP address of the server. For example,
afp://192.168.11.10
Then the shared directories will display. For example.
your_home
your_hdd
-Count
Saturday, February 27, 2016

Tuesday, February 23, 2016
Why XOR can be a symmetric encryption and decryption?
Why does Bluetooth security use XOR as an operation of symmetric encryption and decryption? The formula of symmetric as follows.
C = Enc (P, K)
P = Dec (C, K)
Where
C is cypher text.
P is plain text.
Enc is a symmetric encryption algorithm.
Dec is a symmetric decryption algorithm
K is a key of the encryption and decryption.
The true table of XOR is as follows.
A B X
-----
0 0 0
0 1 1
1 0 1
1 1 0
A XOR B = C
C XOR B = (A XOR B) XOR B = A XOR (B XOR B) = A XOR 0 = A
Therefore we got the formula.
A XOR B = C
C XOR B = A
Lets rename A to P (plain text), and B to K (key), and keep C (cipher).
P XOR K = C
C XOR K = P
Transform it.
C = XOR (P, K)
P = XOR (C, K)
We proof that XOR can be a symmetric encryption and decryption.
-Count
C = Enc (P, K)
P = Dec (C, K)
Where
C is cypher text.
P is plain text.
Enc is a symmetric encryption algorithm.
Dec is a symmetric decryption algorithm
K is a key of the encryption and decryption.
The true table of XOR is as follows.
A B X
-----
0 0 0
0 1 1
1 0 1
1 1 0
A XOR B = C
C XOR B = (A XOR B) XOR B = A XOR (B XOR B) = A XOR 0 = A
Therefore we got the formula.
A XOR B = C
C XOR B = A
Lets rename A to P (plain text), and B to K (key), and keep C (cipher).
P XOR K = C
C XOR K = P
Transform it.
C = XOR (P, K)
P = XOR (C, K)
We proof that XOR can be a symmetric encryption and decryption.
-Count
Wednesday, December 30, 2015
Chinese Text in XBMC Cannot Display on Mac OS
English is the default language in XBMC.

After you chose Language as Chinese (Traditional), the skin displays strangely.

Please change Language back to English.
Go to Appearance - Settings, and change Fonts from Skin default to Arial based.

Then the Chinese skin displays.
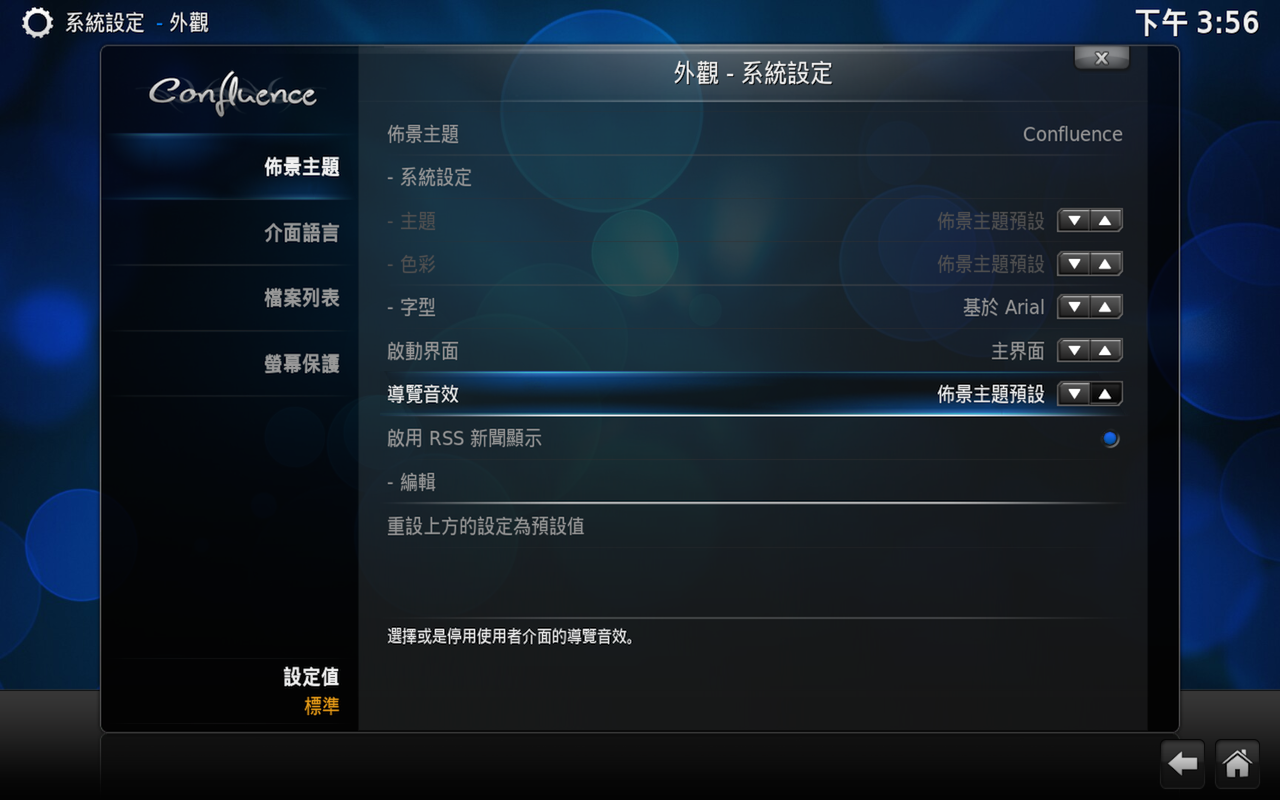
Then you can install the Add-On, AtMovies Movie Scraper.


-Count
Tuesday, December 29, 2015
Use Java Security to read a certificate generated by OpenSSL
The following example uses Java Security to read a certificate that is generated by OpenSSL command and to verify the certificate with the public key that is also generated by OpenSSL command.
Generate a RSA-2048 private kay.
>openssl genrsa -out prv.pem 2048
>openssl rsa -in prv.pem -pubout > pub.pem
Convert public key portino in DER format (so Java can read it)
>openssl rsa -in prv.pem -pubout -outform DER -out pub.der
Convert private key to PKCS#8 format (so Java can read it).
>openssl pkcs8 -topk8 -inform PEM -outform DER -in prv.pem -out prv.der -nocrypt
Generate a CSR signed by prv.pem
>openssl req -new -key prv.pem -out test.csr
password 1234
Generate a certificate, signed by prv.pem, for the CSR.
>openssl x509 -req -days 365 -in test.csr -signkey prv.pem -sha1 -out test.cert
password 1234
Generate another RSA-2048 private kay.
>openssl genrsa -out prv2.pem 2048
Convert public key portion in DER format (so Java can read it)
>openssl rsa -in prv2.pem -pubout -outform DER -out pub2.der
Run the java program to read certificate and to verify it.
D:\Cyber Space\Examples\JavaSecurity
>javac ReadCert.java
>java ReadCert
The portion Java program, ReadCert.java, is as below.
//
// Read an X.509 certificate from "test.cert".
//
FileInputStream fis = new FileInputStream ("test.cert");
BufferedInputStream bis = new BufferedInputStream (fis);
CertificateFactory cf = CertificateFactory.getInstance ("X.509");
if (bis.available () == 0) {
System.exit (0);
}
//
// Dump the certificate.
//
java.security.cert.Certificate cert = cf.generateCertificate (bis);
System.out.println (cert.toString());
//
// Get public key of the certificate.
//
PublicKey pub = cert.getPublicKey ();
System.out.println ("Get the public key of the certificate with " + pub.getEncoded().length + " bytes.");
//
// Verify the cert with public key (pub).
//
System.out.println ("Verify the certificate with the public key.");
try {
cert.verify (pub);
}
catch (Exception e) {
System.out.println ("Exception.");
}
//
// Read public key (pub2) from the file (pub.der).
//
File f = new File ("pub.der");
fis = new FileInputStream (f);
DataInputStream dis = new DataInputStream (fis);
byte [] pubBlob = new byte [(int) f.length()];
System.out.println ("pubBlob.length = " + pubBlob.length);
dis.readFully (pubBlob);
KeyFactory keyFactory = KeyFactory.getInstance("RSA");
PublicKey pub2 = keyFactory.generatePublic(new X509EncodedKeySpec (pubBlob));
System.out.println ("Get the public key, pub2, from the file with " + pub2.getEncoded().length + " bytes.");
//
// Check if pub and pub2 are same.
// They should be same.
//
if (pub.equals (pub2)) {
System.out.println ("pub and pub2 are same.");
} else {
System.out.println ("pub and pub2 are different.");
}
//
// Read another public key (pub3) from the file (pub2.der).
//
f = new File ("pub2.der");
fis = new FileInputStream (f);
dis = new DataInputStream (fis);
byte [] pub2Blob = new byte [(int) f.length()];
dis.readFully (pub2Blob);
keyFactory = KeyFactory.getInstance("RSA");
PublicKey pub3 = keyFactory.generatePublic(new X509EncodedKeySpec (pub2Blob));
System.out.println ("Get the public key, pub3, from the file with " + pub3.getEncoded().length + " bytes.");
//
// Verify the certificate with the public key (pub3).
// The verification should be failed.
//
System.out.println ("Verify the certificate with the public key, pub3.");
try {
cert.verify (pub3);
}
catch (Exception e) {
System.out.println ("Error. An exception occurs. The result is expected.");
}
-Count
Use Java Security to export/import key pair into/from memory blob
I provide the example program of Java Security to explain how to
- export RSA key pair into memory blob.
- import RSA key pair from memory blob.
This example helps us to handle certificate or public key, that are generated by OpenSSL tool, in Java environment.
// generate an RSA-2048 key
System.out.println( "\nGenerate RSA-2048 key pair." );
KeyPairGenerator keyGen = KeyPairGenerator.getInstance("RSA");
keyGen.initialize(2048);
KeyPair key = keyGen.generateKeyPair();
// Export key pair into memory blob.
System.out.println( "Export key pair into memory blob." );
PublicKey pub = key.getPublic ();
PrivateKey prv = key.getPrivate ();
byte[] pubBlob = pub.getEncoded();
byte[] prvBlob = prv.getEncoded();
System.out.println ("Public key with " + pubBlob.length + " bytes: " + pubBlob);
System.out.println ("Private key with " + prvBlob.length + " bytes: " + prvBlob);
// Import key pair from memory blob.
System.out.println( "Import key pair from memory blob." );
KeyFactory keyFactory = KeyFactory.getInstance("RSA");
PublicKey pub2 = keyFactory.generatePublic (
new X509EncodedKeySpec(pubBlob));
PrivateKey prv2 = keyFactory.generatePrivate(
new PKCS8EncodedKeySpec(prvBlob));
KeyPair key2 = new KeyPair (pub2, prv2);
// Check if the two key pairs are same.
if (pub.equals (pub2) && prv.equals (prv2)) {
System.out.println ("Both key pairs are same");
} else {
System.out.println ("Both key pairs are different");
}
-Count
Monday, December 28, 2015
Use Python to enable Bluetooth PAN in Windows
We cannot enable Windows Bluetooth PAN by a program because Windows doesn't public the Bluetooth PAN API that is implemented in bthpanapi.dll. I find a way to enable it by a script method, Python. The idea comes from UI automatic test.
Download and install Python 3.5.1
Install Pillow and PyAutoGUI in Python.
>pip install Pillow
>pip install PyAutoGUI
The Python program to enable Windows Bluetooth PAN is as below.
import os
import pyautogui
os.system ("control printers")
while (True):
Location = pyautogui.locateOnScreen('VIBEZ.png')
if (Location != None):
break
pyautogui.rightClick (Location [0], Location [1])
x = Location [0] + 10
y = Location [1] + 83
pyautogui.click (x, y)
x += 230
pyautogui.click (x, y)
The code opens "Devices and Printers" of Windows Control Panel.
os.system ("control printers")

while (True):
Location = pyautogui.locateOnScreen('VIBEZ.png')
if (Location != None):
break
pyautogui.rightClick (Location [0], Location [1])

The code moves the mouse cursor to the 4th menu item.
x = Location [0] + 10
y = Location [1] + 83
pyautogui.click (x, y)

The code moves the mouse cursor to the right menu item to enable Bluetooth PAN.
x += 230
pyautogui.click (x, y)

-Count
Download and install Python 3.5.1
Install Pillow and PyAutoGUI in Python.
>pip install Pillow
>pip install PyAutoGUI
The Python program to enable Windows Bluetooth PAN is as below.
import os
import pyautogui
os.system ("control printers")
while (True):
Location = pyautogui.locateOnScreen('VIBEZ.png')
if (Location != None):
break
pyautogui.rightClick (Location [0], Location [1])
x = Location [0] + 10
y = Location [1] + 83
pyautogui.click (x, y)
x += 230
pyautogui.click (x, y)
The code opens "Devices and Printers" of Windows Control Panel.
os.system ("control printers")

The code moves the mouse cursor to the icon of "VIBE Z" and click the right button of the mouse to display menu items.
Location = pyautogui.locateOnScreen('VIBEZ.png')
if (Location != None):
break
pyautogui.rightClick (Location [0], Location [1])
x = Location [0] + 10
y = Location [1] + 83
pyautogui.click (x, y)

The code moves the mouse cursor to the right menu item to enable Bluetooth PAN.
x += 230
pyautogui.click (x, y)

-Count
Java Security doesn't support AES-256 in default
The below code in AesExample.java generates an AES-256 key,
KeyGenerator keyGen = KeyGenerator.getInstance("AES");
keyGen.init(256);
Key key = keyGen.generateKey();
but the exception happens when running java AesExample.

The reason is the import regulation in some countries. AES is limited to 128 bits in default security policy.
We can change the security policy by downloading the zip from the site.
KeyGenerator keyGen = KeyGenerator.getInstance("AES");
keyGen.init(256);
Key key = keyGen.generateKey();
but the exception happens when running java AesExample.
The reason is the import regulation in some countries. AES is limited to 128 bits in default security policy.
| Algorithm | Maximum Keysize |
|---|---|
| DES | 64 |
| DESede | * |
| RC2 | 128 |
| RC4 | 128 |
| RC5 | 128 |
| RSA | * |
| all others | 128 |
We can change the security policy by downloading the zip from the site.
Please select "Java Cryptography Extension (JCE) Unlimited Strength Jurisdiction Policy Files for JDK/JRE 8" to download the zip file, jce_policy-8.zip, if we use JDK 8.
Decompress the ZIP file to get the both jar files.
local_policy.jar
US_export_policy.jar
Copy them to the directory to replace old files.
JAVA_HOME\jre\lib\security
Now we can use AES-256 in Java environment.
>javac AesExample.java
>java AesExample
-Count
Subscribe to:
Posts (Atom)