Showing posts with label Python. Show all posts

Sunday, October 30, 2016

Use a computer to emulate devices of temperature connecting to AWS IoT

I modified the sample basicPubSub of the project aws-iot-device-sdk-python to develop the Python tool AwsIotPythonTest.py to test AWS IoT service.

My project is AwsIotPythonTest.

We can use the tool to emulate 3 connected devices, two sensors of temperature and one monitor. They are run in PC environment by opening 3 consoles. When running, they connect to AWS IoT service and exchange temperature information via MQTT as below picture.

The Sensor 1 and Sensor 2 devices connect to AWS IoT Service and publish temperature information to the service. The Monitor device connects to the service and subscribe it to receive temperature information coming from sensor devices. The publish/subscribe model follows MQTT. I described the idea of emulator in the project AwsIotPythonTest in details.

-Count

Thursday, October 27, 2016

How to use a computer as an IoT device to connect AWS IoT service?

Although we don't have Amazon IoT Button or other devices to try AWS IoT, please remember that our computers are devices. Therefore make them IoT.

The sample basicPubSub.py in AWS IoT Python SDK can help us do it.

We follow AWS IoT tutorial to create a device certificate. We download the device certificate, its root CA, and its private key in our local path where the sample exists.

We also create a policy, and a device. We attach both resources into the device certificate.

Because the command arguments of the sample are too long, I prefer to write a makefile Test.mk to test it.

E1 = a2uc??????????.iot.us-west-2.amazonaws.com 
R1 = VeriSign-Class\ 3-Public-Primary-Certification-Authority-G5.pem
C1 = 5988??????-certificate.pem.crt
K1 = 5988??????-private.pem.key

dev1:
    python3 basicPubSub.py -e $(E1) -r $(R1) -c $(C1) -k $(K1)

Run the sample.

>make -f Test.mk dev1

It will publish messages and receive subscribed messages in loop.


-Count

Install AWS IoT Python SDK in Mac

I followed the steps in the page to install AWS IoT Python SDK in my MacBook but I occurred problem.

I checked my Python is version 3.

>python3 -V
Python 3.5.2

But the OpenSSL used by the Python is not 1.0.x that is required by the SDK.

>python3
>>>import ssl
>>>ssl.OPENSSL_VERSION
'OpenSSL 0.9.8zh 14 Jan 2016'

I used brew to download the new OpenSSL.

>brew update
>brew install openssl
>brew link —force openssl

The above command occurred warning.


The command cannot built a link in /usr/bin/openssl because the position is occupied by a real openssl file. I wanted to remove the below openssl but I couldn't.

>cd /usr/bin
>sudo rm -rf openssl
rm: openssl: Operation not permitted

I followed the page to remove it.

>csrutil disable
>reboot
>cd /usr/bin
>sudo rm -rf openssl
>csrutil enable
>reboot

At that time, I made sure that the old openssl was killed.

I built OpenSSL links.

>ln -s /usr/local/opt/openssl/lib/libcrypto.1.0.0.dylib /usr/local/lib/
>ln -s /usr/local/opt/openssl/lib/libssl.1.0.0.dylib /usr/local/lib/
>ln -s /usr/local/Cellar/openssl/1.0.2j/bin/openssl /usr/bin/openssl

I checked the Python's OpenSSL again, it was still 0.9.

>python3
>>>import ssl
>>>ssl.OPENSSL_VERSION
'OpenSSL 0.9.8zh 14 Jan 2016'

The python was installed in a PKG way and the OpenSSL 0.9.8 is embedded in the python. Therefore I wanted to remove the python.

I followed the page to uninstall the old Python 3.

1. Goto Finder>Applications>Python 3.0. Right click, select Move to Trash.

2.
>cd /Library/Frameworks/
>sudo rm -rf Python.framework

I used brew to install Python 3 with OpenSSL 1.0.2.

>brew install python3 --with-brewed-openssl

I checked the Python's OpenSSL again.

>python3
>>>import ssl
>>>ssl.OPENSSL_VERSION
'OpenSSL 1.0.2j  26 Sep 2016'

OKAY. I had upgrated Python and OpenSSL.

Then I downloaded the SDK and run a sample in my MacBook. The final steps followed the end of the page.

-Count

Install AWS IoT Python SDK in Windows

AWS IoT is an IoT platform provided by Amazon to connect devices in cloud. We can use the AWS IoT Python SDK to write Python script to access the AWS IoT platform through MQTT to interact with connected devices. The following are steps of installing the SDK.

Check if the current Python is version 3.

>python -V
Python 3.5.2 ...

I prefer to use Python 3. If it is not, we can download the newest Python 3.5.2 from the website and install it.

https://www.python.org/ftp/python/3.5.2/python-3.5.2.exe

Check the OpenSSL version used by the Python.

>>> import ssl
>>> ssl.OPENSSL_VERSION
'OpenSSL 1.0.2h  3 May 2016'

Install the AWS IoT Python SDK from source that contains samples.

>git clone https://github.com/aws/aws-iot-device-sdk-python.git
>cd aws-iot-device-sdk-python
>python setup.py install

Indeed, we can also install the SDK from pip, but it doesn't have samples.

>pip install AWSIoTPythonSDK

Run a sample

>cd samples/basicPubSub
>python basicPubSub.py

An error occurs.


This page has a workaround:

https://github.com/aws/aws-iot-device-sdk-python/issues/23
import os
import sys
import AWSIoTPythonSDK
sys.path.insert(0, os.path.dirname(AWSIoTPythonSDK.__file__))
# Now the import statement should work
from AWSIoTPythonSDK.MQTTLib import AWSIoTMQTTClient

Run the sample again.

>python basicPubSub.py -h


-Count

Sunday, October 23, 2016

Use BinToImg.py to analyze UEFI BIOS

We can use BinToImg.py to analyze UEFI BIOS. Below is the input files.

  • BIOS.rom - A capsule file built by EDK build system.
  • SPI0.bin - A binary file dumped from SPI ROM 0 after first booting.
  • SPI1.bin - A binary file dumped from SPI ROM 1 after first booting.
The tool BinToImg.py transfers a byte to 8 pixels with black-white color. For example,

Byte = 55h = 01010101
Pixels 
  = 1 -> 0 -> 1 -> 0 -> 1 -> 0 ->1 -> 0
  = black, white, black, white, black, white, black, white


We use the below commands to generate PNG files with black-white bit pixels from the input files.

python3 BinToImg.py -w 6000 BIOS.rom
python3 BinToImg.py -w 6000 SPI0.bin
python3 BinToImg.py -w 6000 SPI1.bin

The option -w 6000 means that the tool generates an image of which width is 6000 pixels.

Below are the generated PNG files. I consider any BIOS engineer know what happens by observing  these images, especially for BIOS.rom.png and SPI1.bin.png.

BIOS.rom.png


SPI1.bin.png


SPI0.bin.png


-Count

Friday, October 21, 2016

Cross Platform Random Bitmap Generator

I created a project, RandomBitmap,  in the below GitHub.
https://github.com/CountChu/RandomBitmap

There are two purposes of the project:

  1. to check if random variables generated by a specified platform (e.g., Windows, Android) are secure.
  2. to check if a file is random or has patterns by observing the black-white bitmap file transformed by the file.
This idea comes from the page, Pseudo-Random vs. True Random. The author uses PHP to transform random numbers to a bitmap. I separated the transformation into two Python programs, GenRandom.py and BinToImg.py because I want to test random number generators on different platforms as the below picture.


GenRandom, is a set of tools written by different languages on different platforms, calls a specified random generator to produce random numbers. These numbers will be saved in a file. The different languages are specified from the below reasons:
  • Python is a cross platform language so that I can use GenRandom.py to test Windows, Linux, and MAC.
  • For Android device, Java is a candidate language. Therefore I'll create a Java version tool, GenRandom.java, to test Android's random generator. 
  • For security IC or UEFI environment, C is a candidate language. The C version tool is named GenRandom.c.
  • For Chrome Browser's Native Client written by C/C++,  the tool will be named GenRandom.c. I'll use it to test random generators of OpenSSL and LIBC in Native Client environment.
  • C# is the first candidate language in, I'll have a C# version, GenRandom.cs, to test Windows CNG.

RandomGenerator.py provides different random generators that are consumed by GenRandom.py:
  • rg1() is a Python default random generator that is random.randint().
  • rg2() is a random generator comes from the page.


BinToImg.py is a python tool that transforms data in a file into an PNG image file with black-white pixels so that we can observe the image to check if these numbers are random. The tool can be used independently. For example, we input any type of file in the tool to generate an picture with black-white pixels to check if the file is randomly.


I use the both tools to verify if the MAC random generator is secure.

>python GenRandom.py Random.bin
>python BinToImg.py Random.bin


I use the tool BinToImg.py to check a PDF file. We can find some patterns in the below picture.

>python BinToImg.py One.pdf


-Count

Monday, December 28, 2015

Use Python to enable Bluetooth PAN in Windows

We cannot enable Windows Bluetooth PAN by a program because Windows doesn't public the Bluetooth PAN API that is implemented in bthpanapi.dll. I find a way to enable it by a script method, Python. The idea comes from UI automatic test.

Download and install Python 3.5.1

Install Pillow and PyAutoGUI in Python.
>pip install Pillow
>pip install PyAutoGUI

The Python program to enable Windows Bluetooth PAN is as below.


import os                                            
import pyautogui                                     
                                                     
os.system ("control printers")                       
                                                     
while (True):                                        
    Location = pyautogui.locateOnScreen('VIBEZ.png') 
    if (Location != None):                           
        break                                        
pyautogui.rightClick (Location [0], Location [1])    
                                                     
x = Location [0] + 10                                
y = Location [1] + 83                                
pyautogui.click (x, y)                               
                                                     
x += 230                                             
pyautogui.click (x, y)                               

The code opens "Devices and Printers" of Windows Control Panel.

os.system ("control printers")


The code moves the mouse cursor to the icon of "VIBE Z" and click the right button of the mouse to display menu items.

while (True):                                       
    Location = pyautogui.locateOnScreen('VIBEZ.png')
    if (Location != None):                          
        break                                       
pyautogui.rightClick (Location [0], Location [1])   


The code moves the mouse cursor to the 4th menu item.

x = Location [0] + 10  
y = Location [1] + 83  
pyautogui.click (x, y) 


The code moves the mouse cursor to the right menu item to enable Bluetooth PAN.

x += 230               
pyautogui.click (x, y) 


-Count


Saturday, May 30, 2015

Use Python to Explain Adapter of Design Pattern

The Adapter is described in the Design Pattern book. Please refer the book for the details. A better way to learn Design Pattern is to program it by yourself. Python is a good language because it supports class and is easy to program than C++. That is why I select it to practice Design Pattern.

This page uses Python to implement an Adapter that displays a directory tree.

TreeDisplay is an abstract class that has two abstract methods GetChildren() and CreateGraphicNode(). The sample uses raise in both abstract methods to notify a programmer that the both are abstract that must be implemented in a derived class.


DirectoryTreeDisplay1 is an Adapter that adapts Python OS package (Adaptee). GetChildren() uses Python OS package to get directory tree. CreateGraphicNode() transforms directory tree to readable text.


Test1() is a test function that tests DirectoryTreeDisplay1 ()


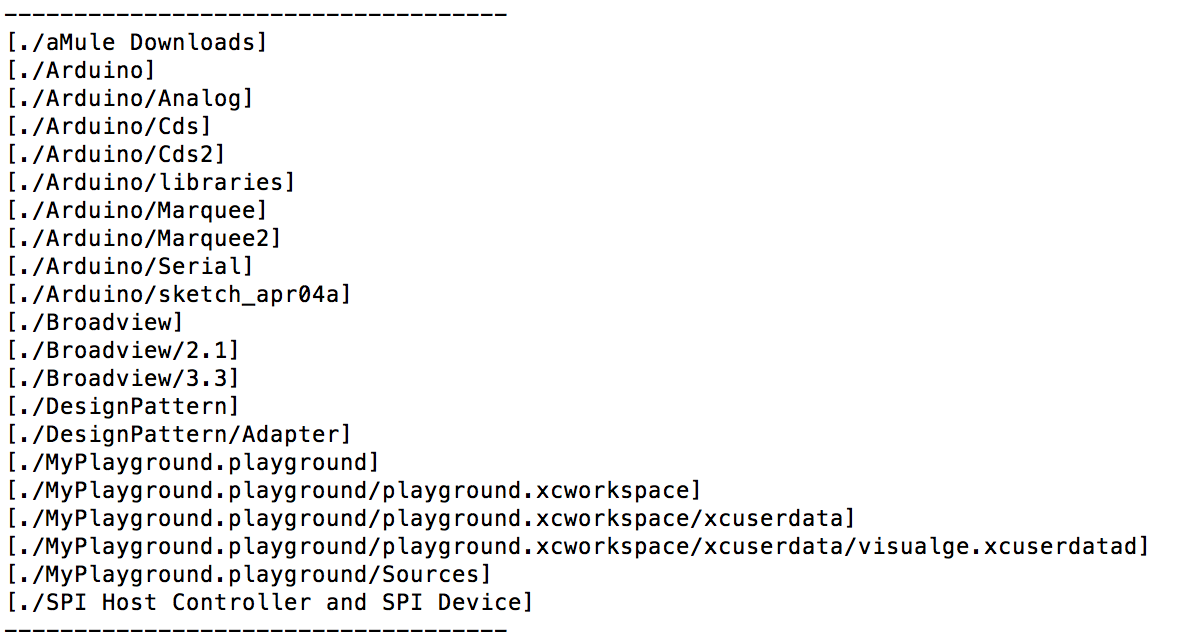
Below is a results after running the Python program in MacBook.
$ python ./DesignPattern/Adapter/TreeDisplay.py


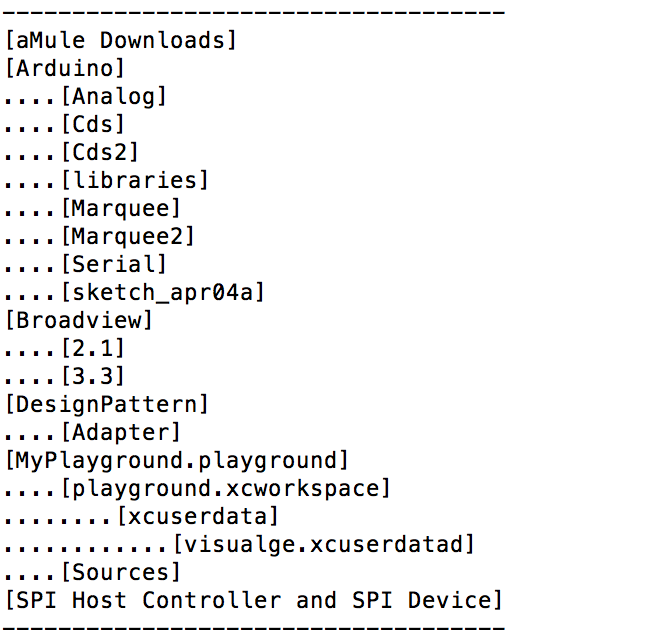
The style of the directory tree is not good. A new Adapter, DirectoryTreeDisplay2, refines the style.


Test2() tests the new Adapter.


The better style of the directory tree displays as below after running the Python program.


The below class diagram summarizes the implementation.


-Count

Thursday, September 11, 2014

Write Python Program to Use DBGHELP.DLL to Access a PDB File

The DBGHELP.DLL is a library provided by Microsoft to access PDB file. This page teaches us,
  1. How to use Python to load DLL.
  2. How to read PDB file to report file path and line number by a given IP register value.
  3. How to use python ctypes.
I select Python to try DBGHELP.DLL because Python is easy for use. Below is the source code. You can run it with the command.
> python DbgHelpTest.py

You can see the results.

DbgHelpTest.py

#
# This source code is free software; you can redistribute it and/or
# modify it under the terms of version 2.1 of the GNU Lesser General Public
# License as published by the Free Software Foundation.
#
# This Python program demonstrates the usage of Windows DBGHELP.DLL by the
# below steps.
# 
# 1. Locate functions of DBGHELP.DLL.
# 2. Load a PDB file at base address.
# 3. Input IP register value.
# 4. Output file path and line number of source code.
#
# Copyright (c) 2014 Count Chu.
#

import os
import ctypes

#
# Please set parameters here.
#

PdbFileName = "VcApp.pdb"               # A PDB file that was created by you.
BaseAddr = ctypes.c_uint64 (0x400000)   # Base address of the PDB file that will be loaded.
IpAddr = ctypes.c_uint64 (0x4113B0)     # IP register value that will be input.

#
# Locate functions of DBGHELP.DLL that are used in the program.
#

DbgHelp = ctypes.WinDLL (r"dbghelp.dll")
print DbgHelp                           # for debug.
SymInitialize = DbgHelp ["SymInitialize"]    
SymSetOptions = DbgHelp ["SymSetOptions"]
SymLoadModule64 = DbgHelp ["SymLoadModule64"]
SymGetLineFromAddr64 = DbgHelp ["SymGetLineFromAddr64"]
SymUnloadModule64 = DbgHelp ["SymUnloadModule64"]

#
# Define enumeration that is used in SymSetOptions.
#

class SymOpt:
    LOAD_LINES = 0x00000010
    UNDNAME = 0x00000002
    DEFERRED_LOADS = 0x00000004
    
#
# Call SymSetOptions().
#

print ("Call SymSetOptions()")          # for debug.
SymSetOptions (SymOpt.LOAD_LINES | SymOpt.UNDNAME | SymOpt.DEFERRED_LOADS)

#
# Get the current process handle. It should be -1.
#

ProcessHandle = ctypes.windll.kernel32.GetCurrentProcess ()
print ("ProcessHandle = %xh" % ProcessHandle) # for debug.

#
# Call SymInitialize().
#

print ("Call SymInitialize()")          # for debug.
Status = SymInitialize (ProcessHandle, None, False)
if not Status:
    print "Error. Calling SymInitialize() failed."
    
#
# Call SymLoadModule64().
#    

FileSize = os.path.getsize (PdbFileName)
print ("FileSize = %d" % FileSize)      # for debug.
print ("Call SymLoadModule64()")        # for debug.
OutBaseAddr = SymLoadModule64 (         # DWORD64 WINAPI SymLoadModule64 (
             ProcessHandle,             #   _In_      HANDLE hProcess,
             0,                         #   _In_opt_  HANDLE hFile,
             PdbFileName,               #   _In_opt_  PCSTR ImageName,
             None,                      #   _In_opt_  PCSTR ModuleName,
             BaseAddr,                  #   _In_      DWORD64 BaseOfDll,
             FileSize)                  #   _In_      DWORD SizeOfDll
                                        #   );
print ("OutBaseAddr = %xh" % OutBaseAddr) # for debug.

#
# Declare IMAGEHLP_LINE64 structure and create a instance of it.
#

class IMAGEHLP_LINE64 (ctypes.Structure):   # typedef struct _IMAGEHLP_LINE64 {
    _fields_ = [                            #   
        ('SizeOfStruct', ctypes.c_uint32),  #   DWORD   SizeOfStruct;    
        ('Key', ctypes.c_void_p),           #   PVOID   Key;
        ('LineNumber', ctypes.c_uint32),    #   DWORD   LineNumber;
        ('FileName', ctypes.c_char_p),      #   PTSTR   FileName;
        ('Address', ctypes.c_uint64)        #   DWORD64 Address;
        ]                                   # } IMAGEHLP_LINE64, *PIMAGEHLP_LINE64;

Line = IMAGEHLP_LINE64 ()                # Create a instance of IMAGEHLP_LINE64.

#
# Call SymGetLineFromAddr64()
#

print ("Call SymGetLineFromAddr64()")   # for debug.
Displacement = ctypes.c_uint32 (0)
Status = SymGetLineFromAddr64 (             # BOOL WINAPI SymGetLineFromAddr64 (
            ProcessHandle,                  #   _In_   HANDLE hProcess,
            IpAddr,                         #   _In_   DWORD64 dwAddr,
            ctypes.byref (Displacement),    #   _Out_  PDWORD pdwDisplacement,
            ctypes.byref (Line))            #   _Out_  PIMAGEHLP_LINE64 Line
                                            # );
print ("Status = %xh" % Status)         # for debug.
if not Status:
    print "Error. Calling SymGetLineFromAddr64() failed."
    
#
# Dump Displacement and IMAGEHLP_LINE64.
#    
    
print ("Displacement = %d" % Displacement.value)
print ("Dump Line:")
print ("  SizeOfStruct = %d" % Line.SizeOfStruct)
print ("  Key          = %s" % Line.Key)
print ("  LineNumber   = %d" % Line.LineNumber)
print ("  FileName     = %s" % Line.FileName)
print ("  Address      = %xh" % Line.Address)

#
# Call SymUnloadModule64()
#
    
Status = SymUnloadModule64 (ProcessHandle, BaseAddr)
if not Status:
    print "Error. Calling SymUnloadModule64() failed."

Wednesday, September 10, 2014

How to Tweak EDKII BaseTools

Sometimes BIOS engineers need to tweak EDKII BaseTools to add some enhancements. Most of EDKII build tools are developed in Python scripts that are frozen into executables (EXE files) by cx_freeze. The BaseTools directory contains Python source code. The path is, for example.

D:\EDKII\BaseTools\Source\Python

We can modify them and rebuilt them into executables. This page teach us how to do it. If you have modified Python scripts files in the BaseTools directory, please follow the following steps to build executables.

Step 1. Install Python 2.7.

Please make sure that if the Python 2.7 is installed. If not, please go to python website, download it, and install it. The installed path is, for example.
C:\Python27

Step 2. Install cx_freeze.

Please check if cx_freeze installs in Python 2.7. How do we check it? Just run dir.
C:\Python27\Scripts> dir *freeze*.*

If the cx_freeze has been installed. The dir command displays as follows.

    68 cxfreeze
 1,256 cxfreeze-postinstall
    78 cxfreeze-quickstart
    78 cxfreeze-quickstart.bat
    67 cxfreeze.bat

If the cx_freeze has not been installed, please go to the page. http://cx-freeze.sourceforge.net

Please click the PyPI link in the page,  download cx_Freeze-4.3.3.win32-py2.7.exe, and install it.

Step 3. Check if the cxfreeze.bat exists.

Sometimes the cxfreeze.bat is missed after we install cx_freeze. If the file doesn't exist in python script path, (e.g., C:\Python27\Scripts), please manually create it as follows.

cxfreeze.bat
@echo off
C:\Python27\python.exe C:\Python27\Scripts\cxfreeze %*

Step 4. Go to BaseTools directory. 

For example,
D:\EDKII\BaseTools\Source\Python

Step 5. Check the Makefile file and change it if necessary.

Sometimes we use old BaseTools where Makefile uses FreezePython.exe not cxfreeze.bat. Please modify it as follows.

Makefile
# FREEZE=$(PYTHON_FREEZER_PATH)\FreezePython.exe
FREEZE = $(PYTHON_FREEZER_PATH)\cxfreeze.bat

Step 6. Set environment variables before building.

> set PYTHON_FREEZER_PATH=C:\Python27\Scripts
> set BASE_TOOLS_PATH=D:\EDKII\BaseTools
> set EDK_TOOLS_PATH=D:\EDKII\BaseTools

Step 7. Run "nmake all"

D:\EDKII\BaseTools\Source\Python> nmake all

You can find that the executables are generated in BaseTools Win32 path. For example,
D:\EDKII\BaseTools\Bin\Win32


Tuesday, September 2, 2014

Use Python PDBparse to parse PDB files.

PDBparse is a Python package for parsing Microsoft PDB files. I like Python solution for parsing PDB files because it is open source. By running its examples, I easily understand PDB format without reading PDB spec initially if there is really a PDB spec.

This page just describes how to install the package and how to run its examples.

Below is the website of PDBparse.
https://code.google.com/p/pdbparse/

We can download the source code here.
http://pdbparse.googlecode.com/svn/trunk

So please check out it and put it in a directory. For example, D:\pdbparse. Let's build it and install it.
D:\pdbparse>python setup.py build
running build
running build_py
running build_ext
building 'pdbparse._undname' extension
error: Unable to find vcvarsall.bat

If the error occurs, please don't give up. When running setup.py, Python 2.7 searches for Visual Studio 2008. If we don't have the version or another version of Visual Studio, the error occurs. We can trick  Python by setting an environment variable. For example, environment has Visual Studio 2005.
>set VS90COMNTOOLS=%VS80COMNTOOLS%

Let's build the package again.
D:\pdbparse>python setup.py build
LINK : error LNK2001: unresolved external symbol init_undname
build\temp.win32-2.7\Release\src\_undname.lib : fatal error LNK1120: 1 unresolved externals
error: command '"C:\Program Files\Microsoft Visual Studio 8\VC\BIN\link.exe"' failed with exit status 1120

If the error occurs, we should check if the init_undname is defined in C files. There is only one C file, undname.c, in the source files of package. The file doesn't define init_undname but has undname() routine.
char *undname(char *buffer, char *mangled, int buflen, unsigned short int flags)
{
    return __unDName(buffer, mangled, buflen, malloc, free, flags);
}

Therefore my solution is to create init_undname() to wrap undname(). Please add the following init_undname() in undname.c.
char *init_undname(char *buffer, char *mangled, int buflen, unsigned short int flags)
{
  return undname (buffer, mangled, buflen, flags);
}

Let's try it again. It should be successful.
D:\pdbparse>python setup.py build

Let's install the package in Python environment.
D:\pdbparse>python setup.py install

Now we can run the examples of the package. It should be run successfully
D:\pdbparse\examples\python pdb_dump.py Test.pdb

Please run another example.
python pdb_get_syscall_table.py Test.pdb
  File "C:\Python27\lib\site-packages\pdbparse\info.py", line 1, in <module>
    from construct import *
ImportError: No module named construct

If the ImportError occurs, please download the contruct package here.
http://construct.readthedocs.org/en/latest/

Download the source code of construct package and put it in a directory. For example, D:\construct-2.5.2. Please build it and install it.
D:\construct>python setup.py build
D:\construct>python setup.py install

Please run the example again
python pdb_get_syscall_table.py Test.pdb
  File "C:\Python27\lib\site-packages\construct\lib\binary.py", line 1, in <module>
    import six
ImportError: No module named six

The error occurs because construct package depends on six package and we miss it. Please download it, build it, and install it.
https://pypi.python.org/pypi/six/1.7.3
D:\six-1.7.3>python setup.py build
D:\six-1.7.3>python setup.py install

Please run the example again
python pdb_get_syscall_table.py Test.pdb
Traceback (most recent call last):
  File "pdb_get_syscall_table.py", line 9, in <module>
    from pefile import PE
ImportError: No module named pefile

So the example need pefile package to parse EXE file and we miss the package. Please download it, build it and install it.
D:\pefile-1.2.10-139>python setup.py build
D:\pefile-1.2.10-139>python setup.py install

Now the example can be run successfully. There are many others examples help us to understand the PDB file format. W can try them.

pdb_dump.py
pdb_get_syscall_table.py
pdb_lookup.py
pdb_print_ctypes.py
pdb_print_gvars.py
pdb_print_tpi.py
pdb_tpi_vtypes.py
symchk.py
tpi_closure.py
tpi_print_construct.py
tpi_size.py

Monday, April 14, 2014

PyQt addToolBarBreak () - Create Two Toolbars

We can use addToolBarBreak () to create two toolbars. One is followed by another with a line break. Here is an example of PyQt.

import sys
from PyQt4 import QtGui

class MyMainWindow (QtGui.QMainWindow):
   
    def __init__ (self):
        super (MyMainWindow, self).__init__ ()
       
        Toolbar1 = self.addToolBar ("")
        self.addToolBarBreak ()
        Toolbar2 = self.addToolBar ("")
       
        Cb = QtGui.QComboBox ()
        Toolbar1.addWidget (Cb)
        Cb = QtGui.QComboBox ()
        Toolbar1.addWidget (Cb)

        Cb = QtGui.QComboBox ()
        Toolbar2.addWidget (Cb)
        Cb = QtGui.QComboBox ()
        Toolbar2.addWidget (Cb)
       
        self.setGeometry (300, 300, 300, 200)
        self.setWindowTitle ('Multiple Toolbars')
        self.show ()
       
def main():
    App = QtGui.QApplication (sys.argv)
    MainWindow = MyMainWindow ()
    sys.exit (App.exec_ ())

if __name__ == '__main__':
    main()


We can also use addToolBarBreak () to create multiple toolbars.

Thursday, April 3, 2014

PyQt QTextEdit - Get the current line number when/where the mouse is pressed.

Here is an easy way to get the current line number in QTextEdit when/where you press mouse. This way doesn't derive QTextEdit or install event filter. This way just delegates mouseReleaseEvent to your event handler.

import sys
from PyQt4 import QtCore, QtGui

class MainWindow (QtGui.QMainWindow):

    def __init__ (self, parent=None):
        super (MainWindow, self).__init__(parent)

        self.BuildEditor ()
        self.setCentralWidget(self._Editor)
        self.setWindowTitle("Get line number in QTextEdit when mouse is pressed.")

    def BuildEditor (self):
        self._Editor = QtGui.QTextEdit ()
        self._Editor.setReadOnly (True)
        self._Editor.mouseReleaseEvent = self.MyMouseReleaseEvent
        
        Font = QtGui.QFont ()
        Font.setFamily ('Courier')
        Font.setFixedPitch (True)
        Font.setPointSize (10)
        self._Editor.setFont (Font)

        Text = "aaaaaaaaaaaaaaaaaaaaaaa\n"
        Text += "bbbbbbbbbbbbbbbbbbbbbbb\n"
        Text += "ccccccccccccccccccccccc\n"
        Text += "ddddddddddddddddddddddd\n"
        self._Editor.setPlainText (Text)
       
    def MyMouseReleaseEvent (self, Event):
        print ("Release the mouse.")
        Pos = Event.pos()
        print ("Pos = (%d, %d)" % (Pos.x (), Pos.y ())) 
        Cursor = self._Editor.cursorForPosition (Pos)
        X = Cursor.columnNumber();
        Y = Cursor.blockNumber();        
        print ("Cursor = (%d, %d)" % (X, Y))    
        
if __name__ == '__main__':
    App = QtGui.QApplication (sys.argv)
    Window = MainWindow ()
    Window.resize (640, 512)
    Window.show ()
    sys.exit (App.exec_())

Monday, February 3, 2014

How to avoid cx_Freeze generating Library.zip when packing Python files?

The cx_Freeze is a tool that packs Python files to generate a EXE file. How do we avoid it generating Library.zip? The following source tree is an example.

[Workspace]
  [MyApp]
    Setup.py ---- cx_Freeze setup program
    MyApp.py ---- the python file that will be packed in EXE.
  [build]    ---- The directory is generated by cx_Freeze

The content of the Setup.py is:

We perform the following command to pack MyApp.py in MyApp.exe.

Workspace> python MyApp\Setup.py build

You cannot find Library.zip in the build directory because create_shared_zip is assigned to False.

-Count

Sunday, February 2, 2014

When do we use Python's "with as"?

Generally, we use the below Python code with three lines to write data into a file.

f = open ("Test.txt", "w")
f.writelines (Lines)
f.close ()

Sometimes, we are lazy to use one line to do the same thing.

open ("Test.txt", "w").writelines (Lines)

That is OKAY. Data will be automatically written into the file because f.close() is automatically called when the Python program exits.

But there is a problem. The below second line cannot read any new data from the file because new data has not been written by the first line.

open ("Test.txt", "w").writelines (Lines)
Lines = open ("Test.txt").readlines ()

We found that Lines are empty because the file "Test.txt" is not closed.

We can use "with as" supported by Python 2.6 to solve the problem.

with open ("Test.txt", "w") as f:
    f.writelines (Lines)
Lines = open ("Test.txt").readlines ()

When the block of "with as" finishes, f.close() is automatically called. Therefore the third line can read data from the file into Lines.

We can refer the below page for more detail of "with as".
http://openhome.cc/Gossip/Python/WithAs.html

-Count

Saturday, January 18, 2014

A way to change a system environment variable in Python program.

In Python program we can set system environment variables by using os.environ. For example,

os.environ ["DDD"] = "..." 

But there is a problem that the variable will be disappear after the Python program exits because the variable is owned by the Python program.

The following way can solve the problem to create an environment variable with Python and share it with other programs.

-Count

Wednesday, January 15, 2014